Connecting K2 Five to Microsoft Graph
Update (07 Oct 2019)
I discovered two configuration issues with the guidance in this post which I have now corrected.
- The V1 EndPoints must be used rather than V2
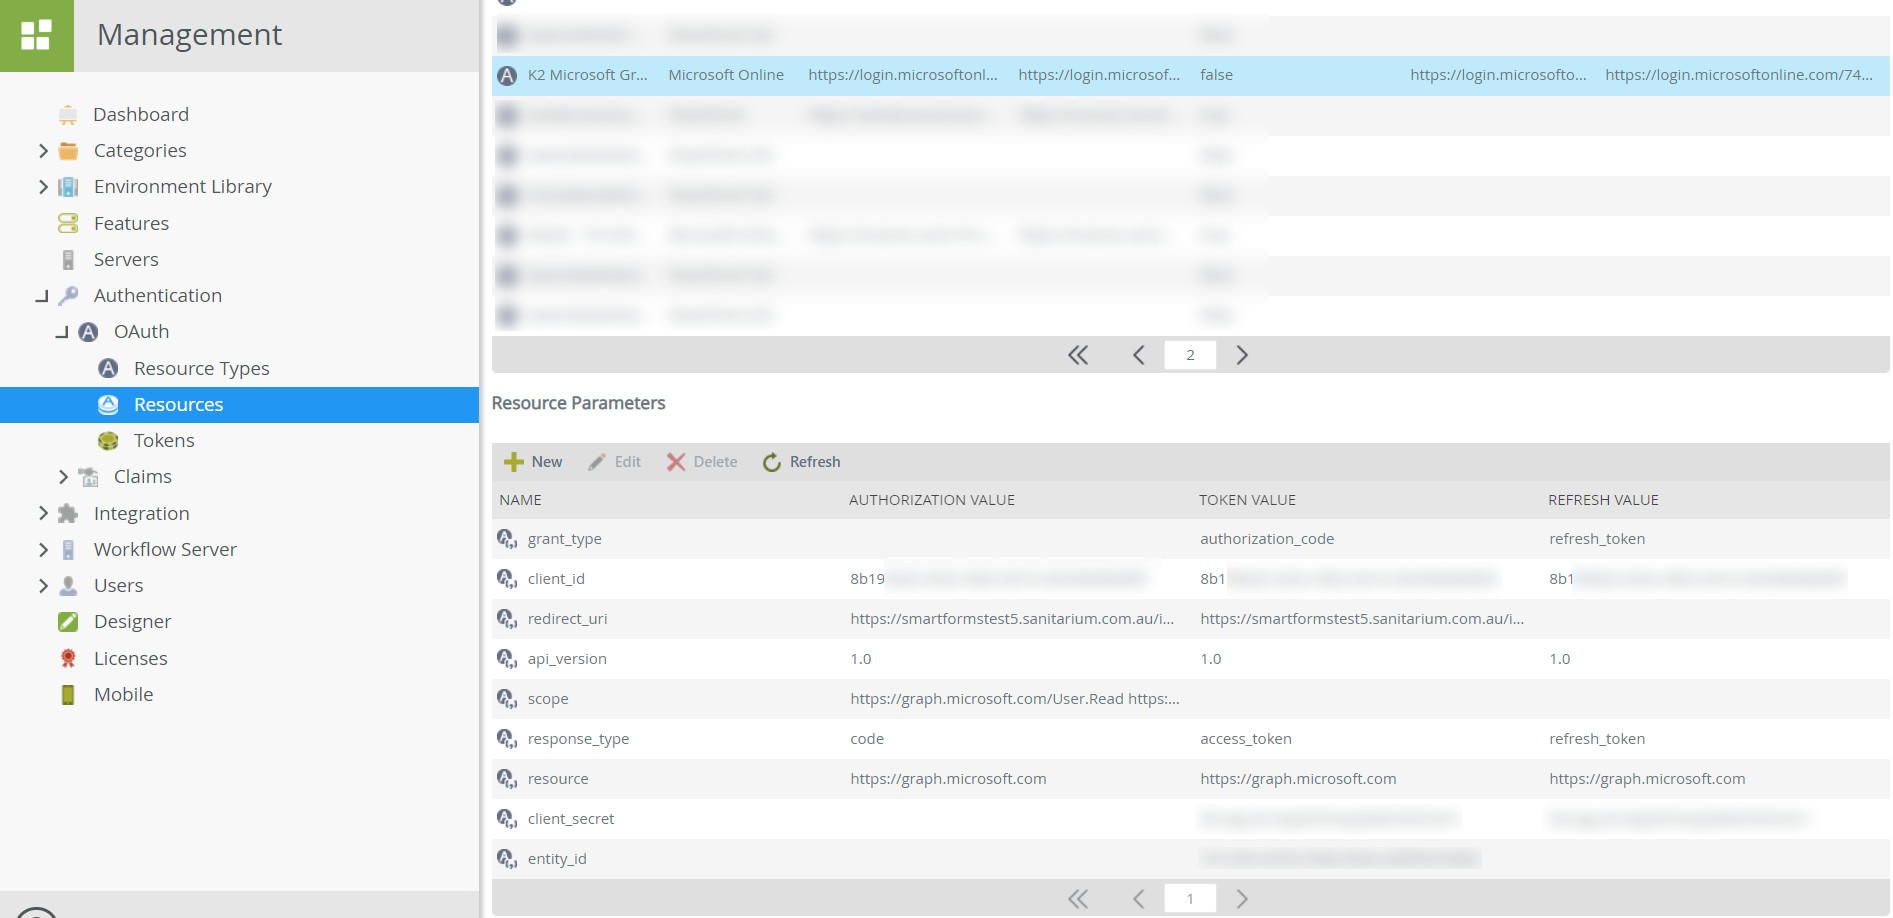
- Include https://graph.microsoft.com in the resource parameters
Without these adjustments, K2 does not store a refresh token and it will expire daily.
For those organisations that use K2 Five and Office 365, the ability to use Microsoft Graph APIs in your forms and workflows is compelling.
The guidance on how to do so using the REST Service Broker seems sparse, so here is my experience of how to configure things to connect K2 to Microsoft Planner. It should be straightforward to enhance the swagger file to add additional services as you need once the basics are configured.
In this case I am assuming SharePoint Online has been configured with the K2 App.
The high level process is as follows;
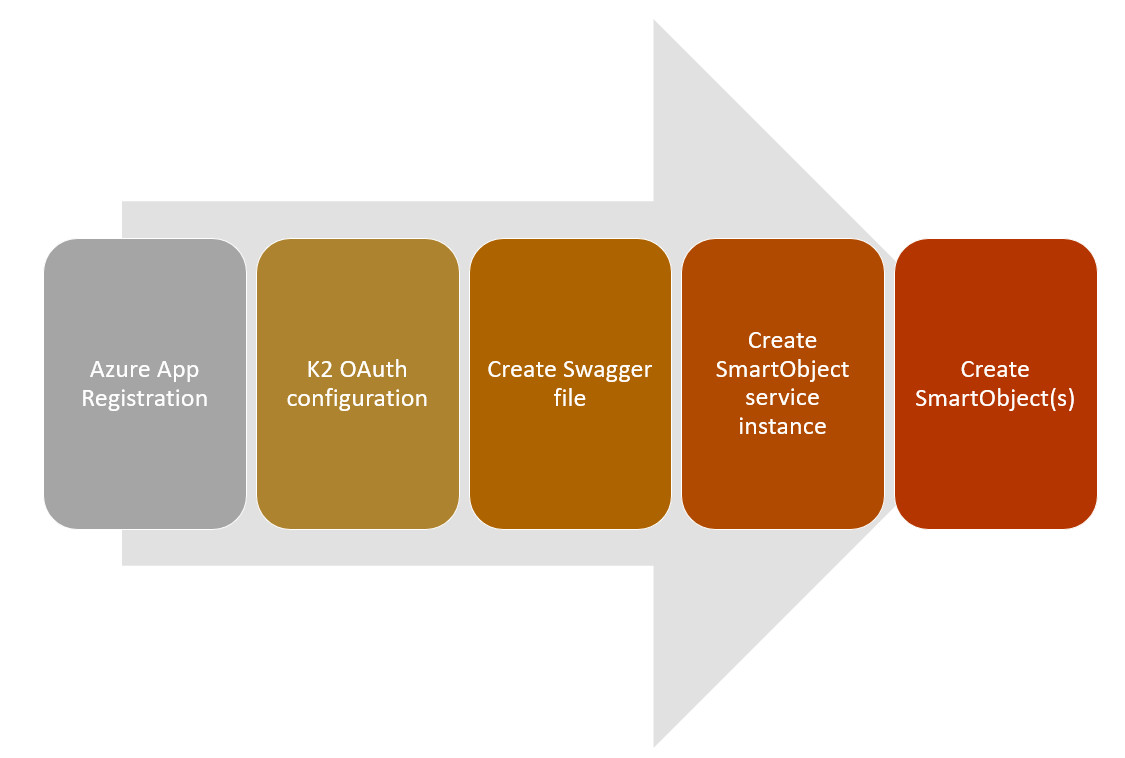
Configure the Azure Application Registration
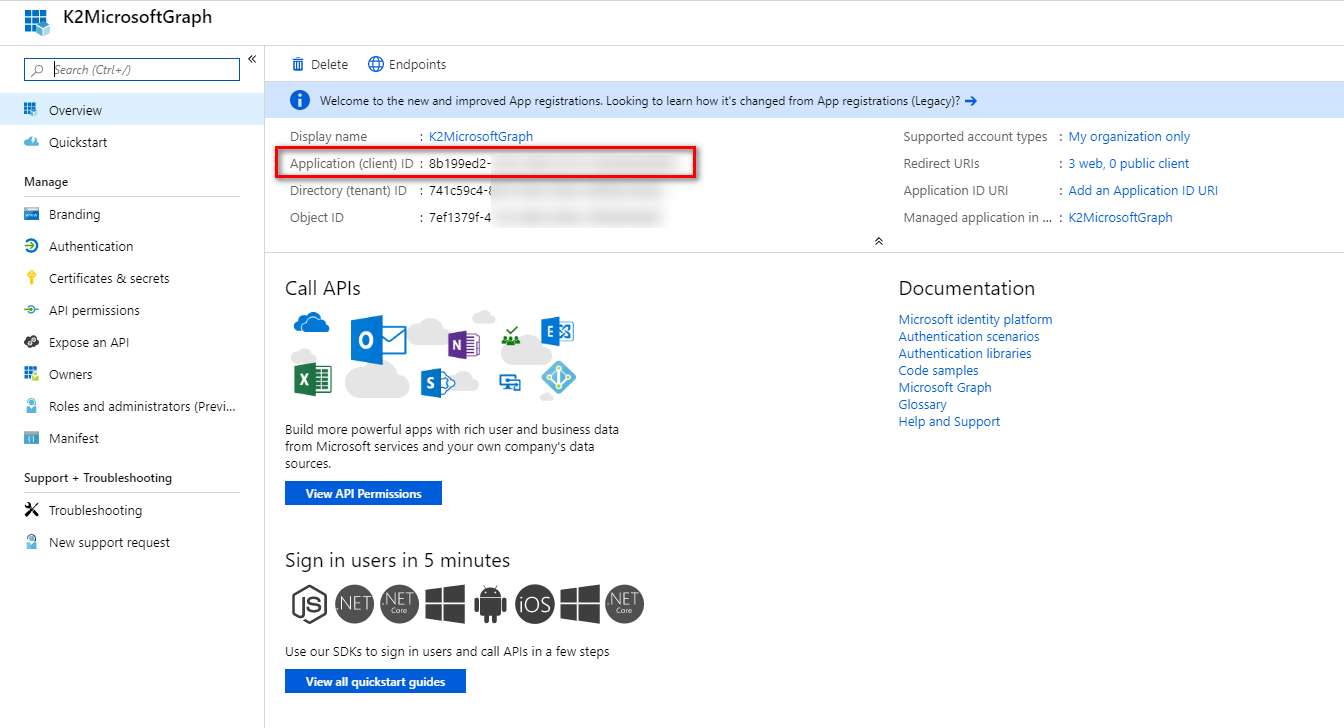
Create an App Registration in the Azure AD Portal. Make a note of the Application (client) ID.
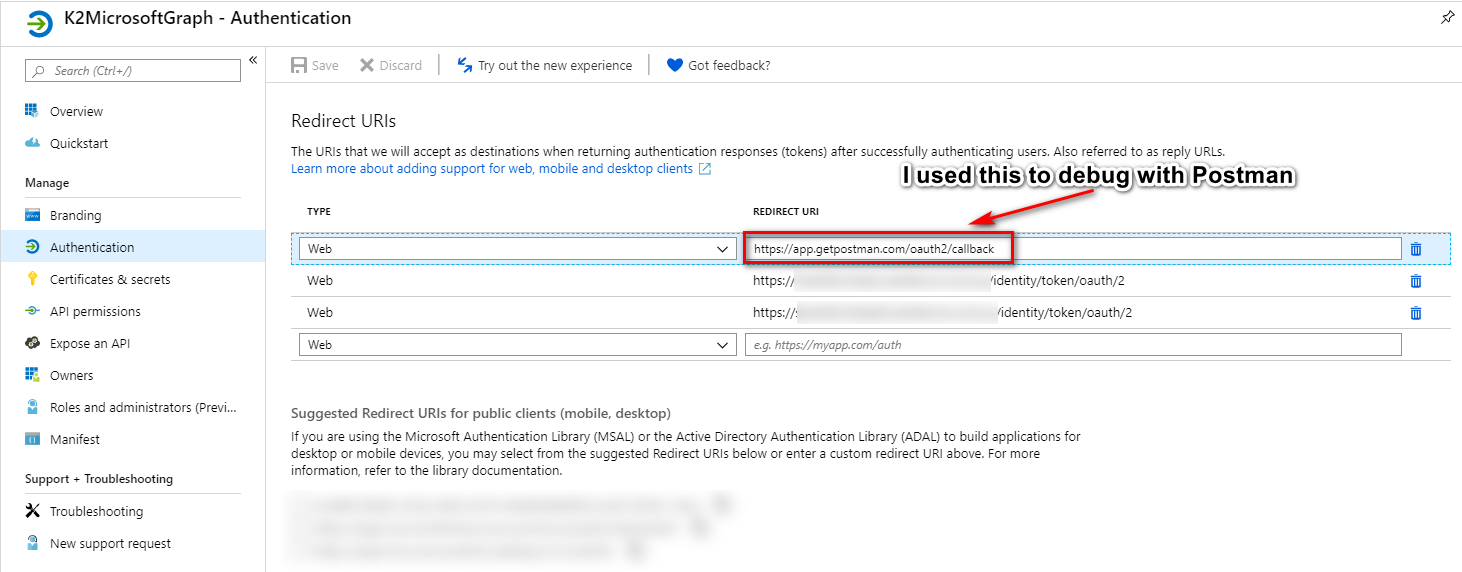
Click on the Redirect URIs link and add https://(yourK2URI)/identity/token/oauth/2
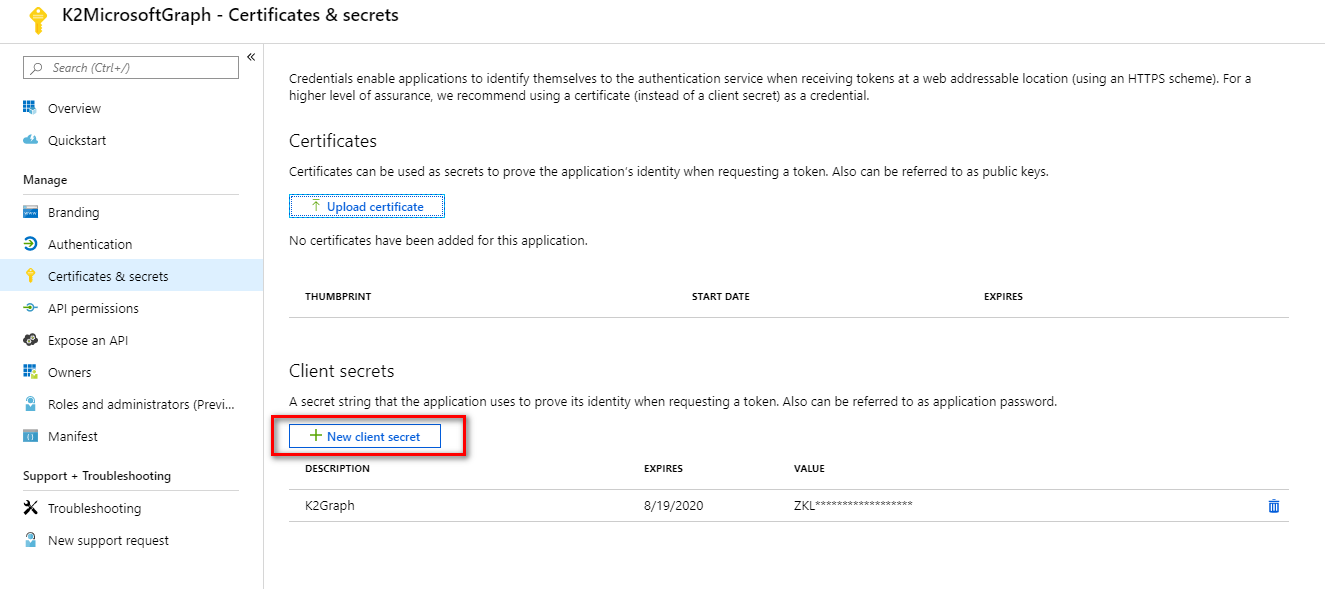
Click the Certificates and Secrets link and add a client secret. Make sure you copy it somewhere as you won’t be able to see it here later.
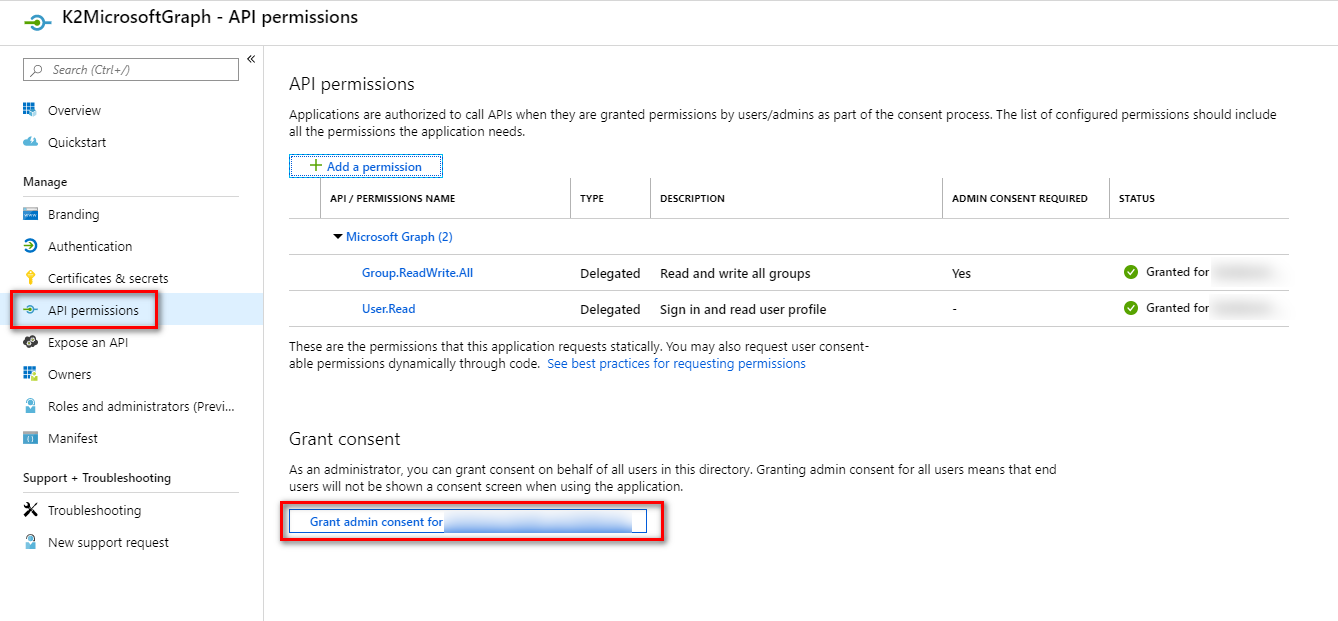
Now add the API permissions for what we need to access. In this case, we need Group.ReadWrite.All and User.Read in order to use the Planner API. You’ll need to grant admin consent for the added permissions.
Now we need to get the Endpoint URIs.
- OAuth 2.0 authorization endpoint (v1)
- OAuth 2.0 token endpoint (v1)
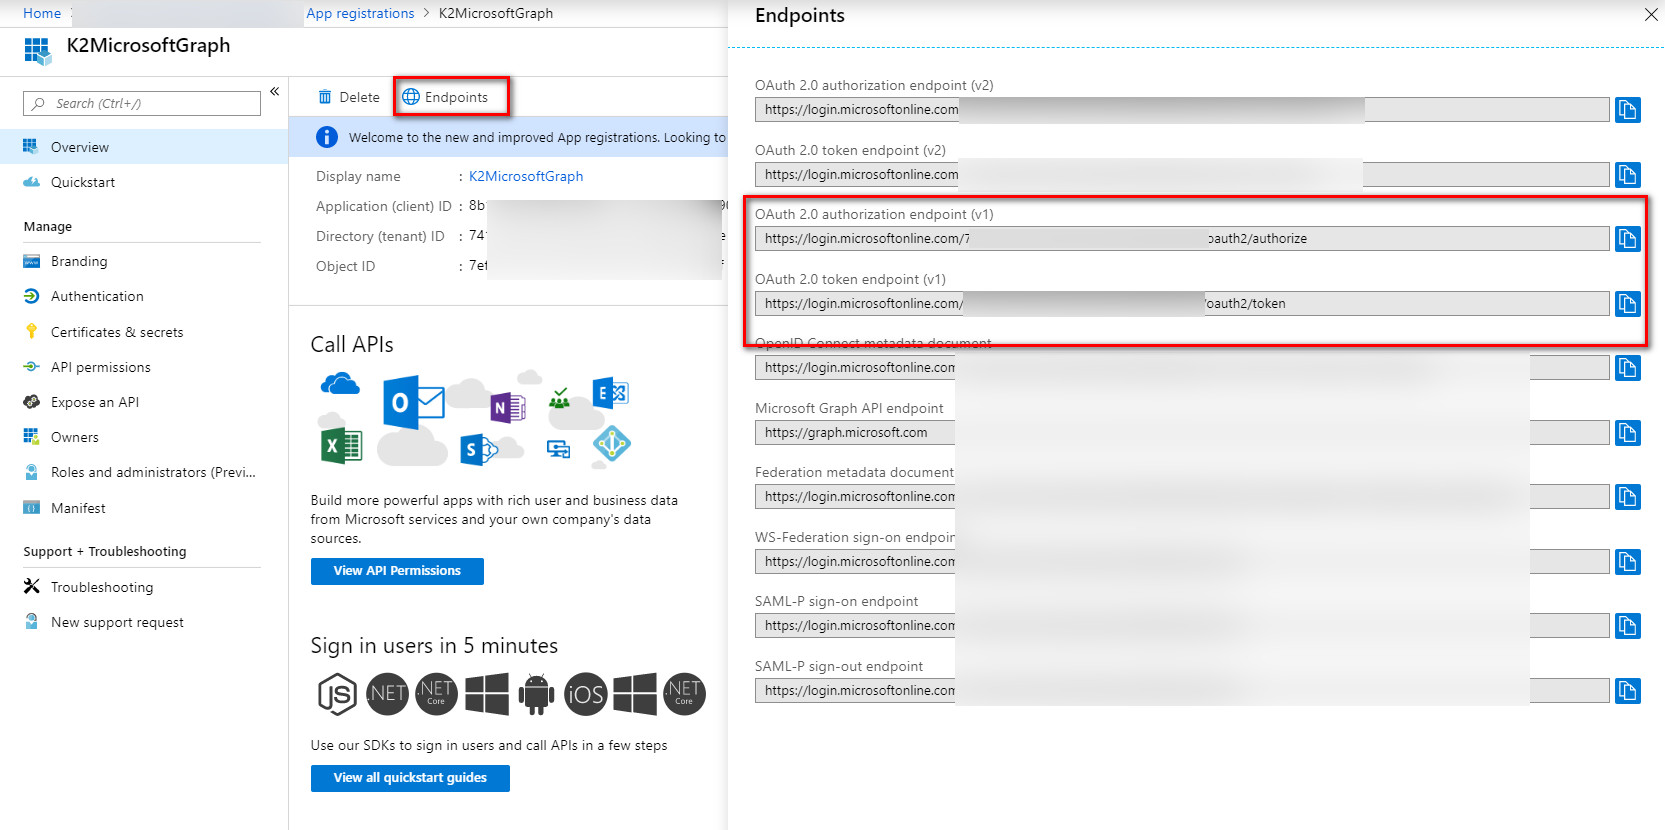
At the end of this process you should have noted the following;
- Application (client) id
- Client secret
- Redirect URI
- OAuth 2.0 authorization endpoint (v1)
- OAuth 2.0 token endpoint (v1)
K2 OAuth Configuration
Open K2 Management and navigate to Authentication > OAuth > Resources
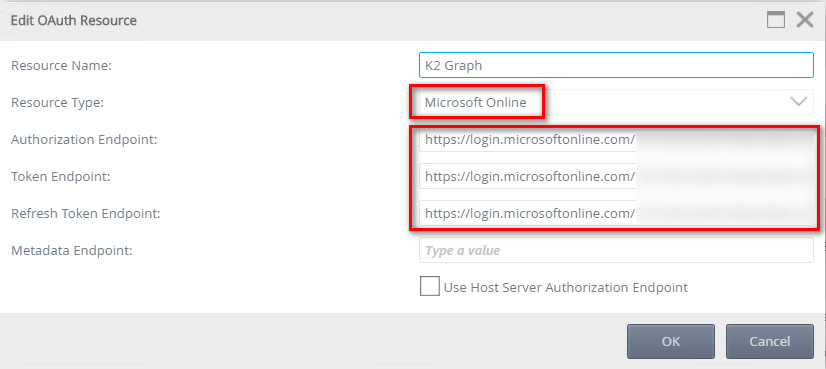
Create a new Resource
Select the Microsoft Online resource type and input the OAuth 2.0 authorization endpoint (v2) and OAuth 2.0 token endpoint (v2) URIs you noted down previously.
Selecting the resource that you have created, add the Application (client) id, Client secret, Redirect URI, resource and API permissions to complete the parameters as follows;
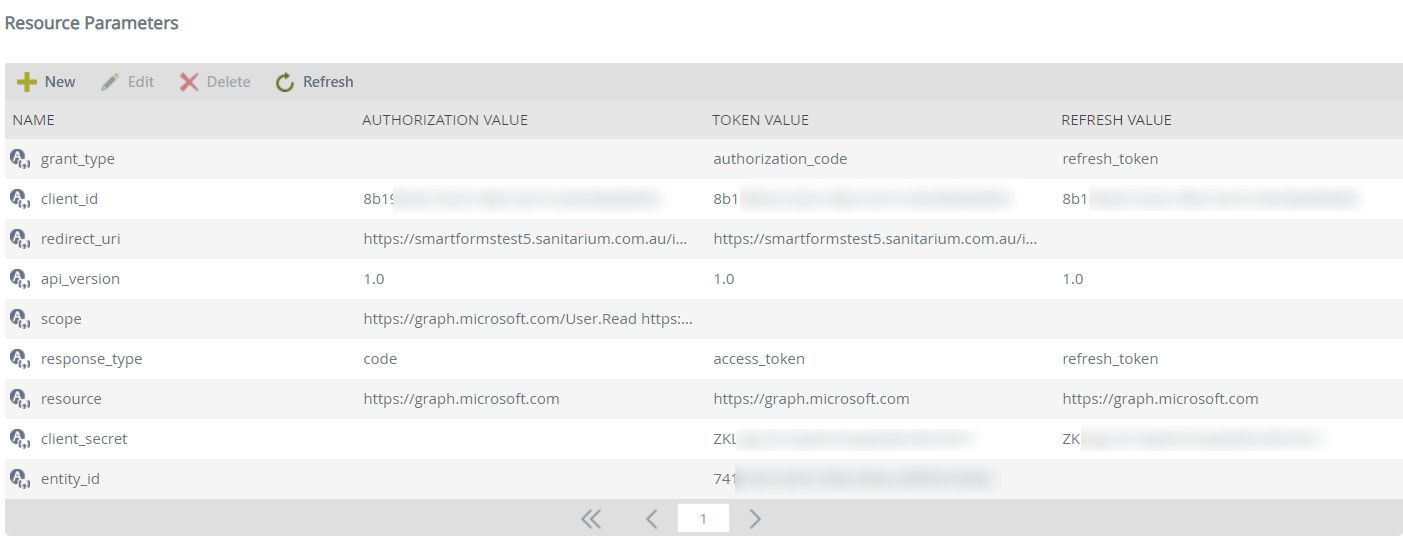
In this case the Scope for the Authorization value is https://graph.microsoft.com/User.Read https://graph.microsoft.com/Group.ReadWrite.All separated by a space.
K2 should now be configured to connect to the Microsoft Graph and obtain authorisation for the Application Registration we created.
Create a Swagger file to describe the API
K2 uses an Open API (Swagger v2.0) file to define the paths, input parameters and return values for the SmartObjects we create. I spent some time trying to use sites to generate the Swagger file for me. APIMatic and RESTUnited both have the ability to generate Swagger files. You can point them at a publicly available API or use Postman to call the desired API and save as a collection, which can be imported into one of those sites to generate the Swagger file. In the end, I decided to create it manually.
TIP: I found it very useful to edit the file manually as it gave me a much better understanding of what it does.
I found a sample here from Graham-K2 which became my starting point.
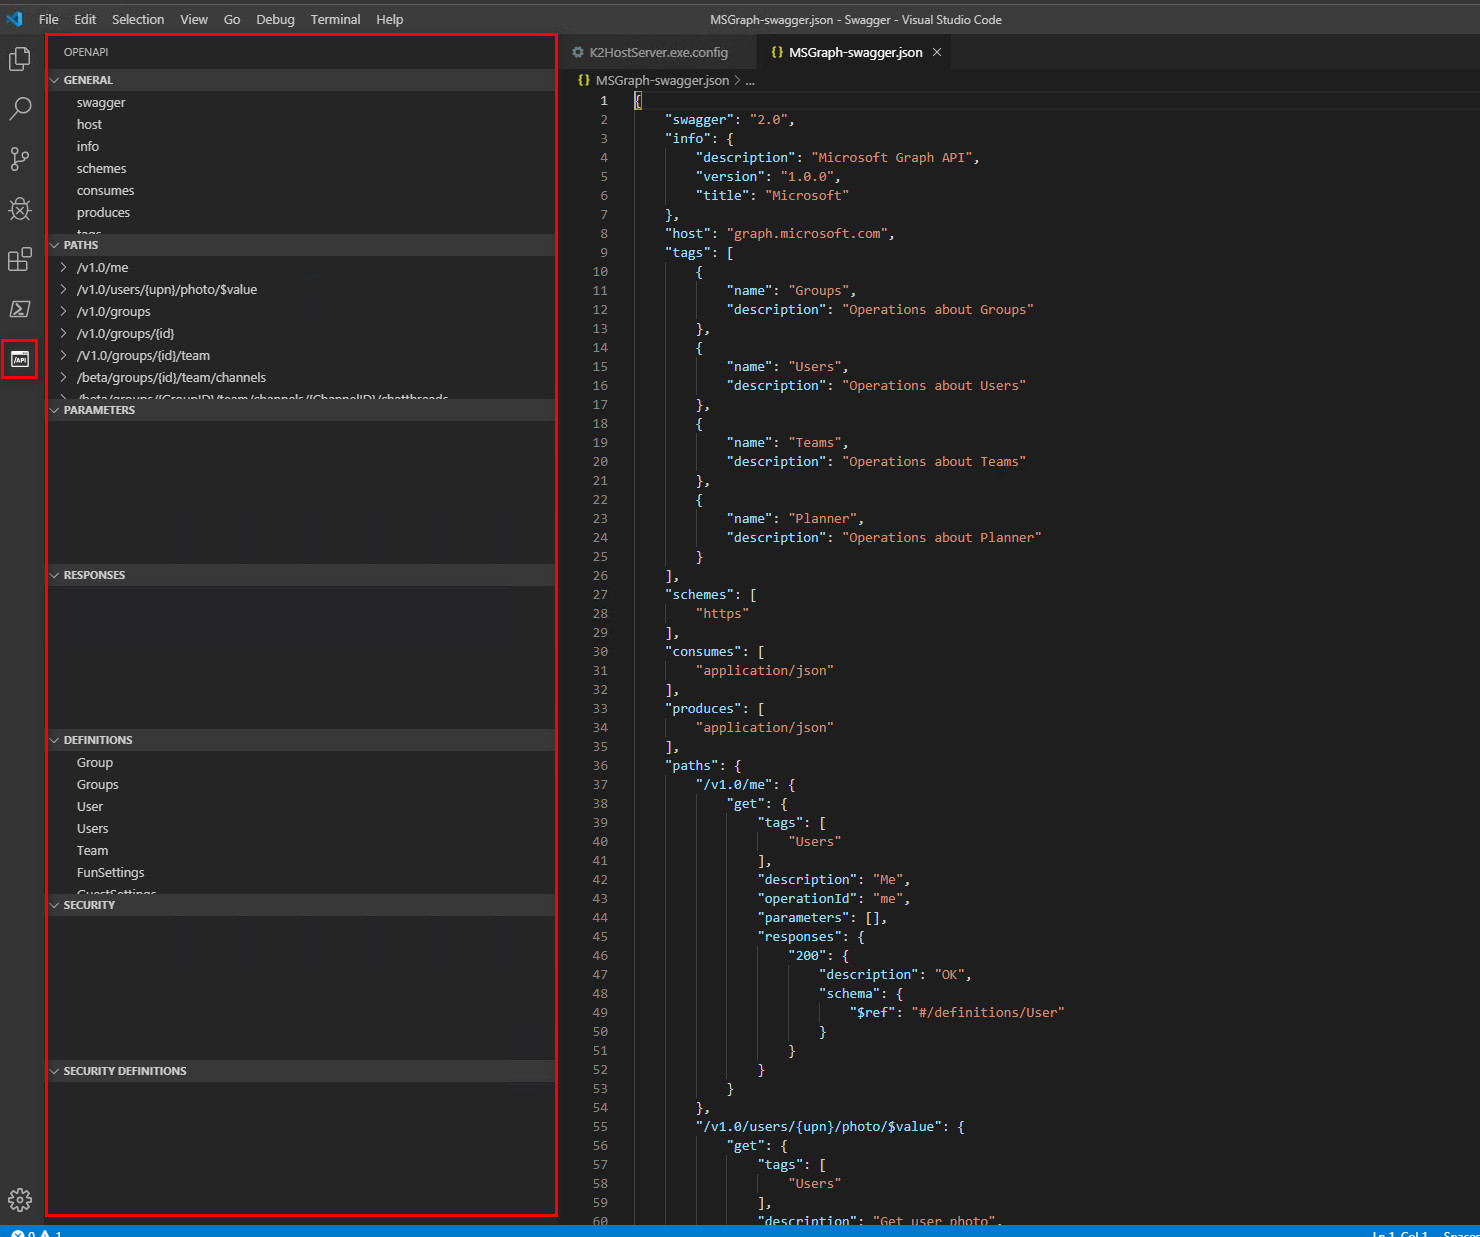
Visual Studio Code has a handy extension for Swagger files called “OpenAPI (Swagger) Editor” which displays the structure of your file and when the structure doesn’t display in the API pane, then you know you have a problem. When that happened I pasted the file into the https://editor.swagger.io/ page which gave me a better view of what the errors were.
I made heavy use of Postman to call the Planner APIs and see what the structure of the request and responses was. An easy way to get started with this is to use the Postman collection available from Microsoft here.
The other key to being able to work out how to get this working was to setup my development K2 server to proxy through Fiddler. To do that, I modified the K2HostServer.exe.config to enable the proxy as follows:
<defaultProxy enabled="true" useDefaultCredentials = "true"> <proxy autoDetect="false" bypassonlocal="false" proxyaddress="http://127.0.0.1:9999" usesystemdefault="false" /> </defaultProxy>
Then I configured Fiddler to decrypt https traffic and set the port to 9999.
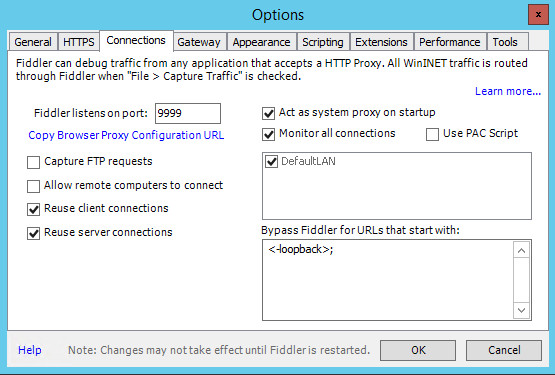
This is incredibly useful because you can see exactly what K2 is sending and receiving over http.
You can get the Swagger file I am currently using from GitHub here
The Swagger file is made up of paths and definitions which is where we spend most of our time setting this up.
When we create a path, it includes the URI path we will call, the method to use, the input parameters and the response. In this example, the shape of the response is defined with a definition of a TaskItem.
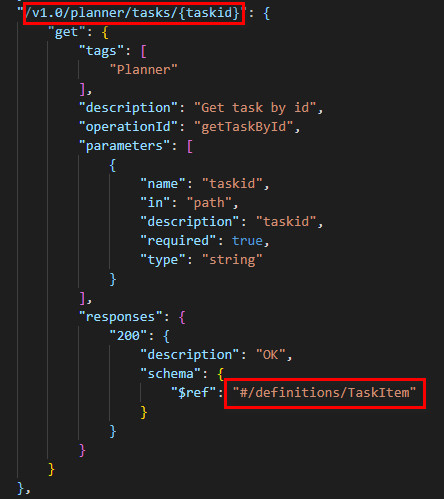
The Task Item definition looks like this. (I’ve cut off the image for brevity. Look at the file for the full description)
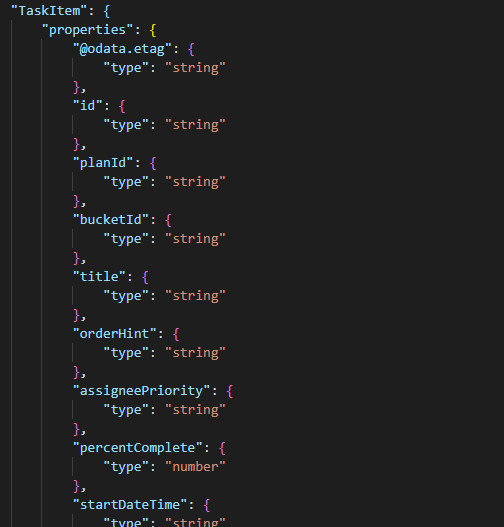
Based on this definition, K2 can then work out what the input and output should look like.
Configure SmartObject Service Instance
Now we have the swagger file, we can start to configure the SmartObject service instance. I’m using SmartObject Service Tester, but you could use the K2 Management UI if you want to. When creating the instance, choose OAuth as the Authentication mode and then choose the OAuth resource that we created previously. Another thing I needed to do is change ‘Add HTTP Request Header Property To Methods’ to true. When working with Graph you sometimes the need to chain methods together. For example, to update the description in a planner task, it required me to get the etag of the current description and then pass that back in the header as an IF-MATCH. The only way I found to do this is by turning on the Header Property.
The path to the swagger file we created is also required at this time. It needs to be accessible on the K2 server.
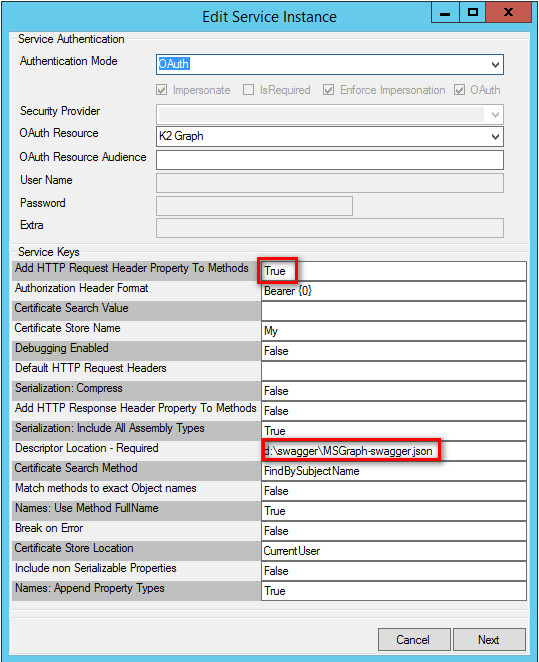
Once you create the service instance, you will now have types with methods and properties defined in the swagger file available to create SmartObjects. An important type is the HttpHeader. I use this to serialise and deserialise the etag value to and from the header.
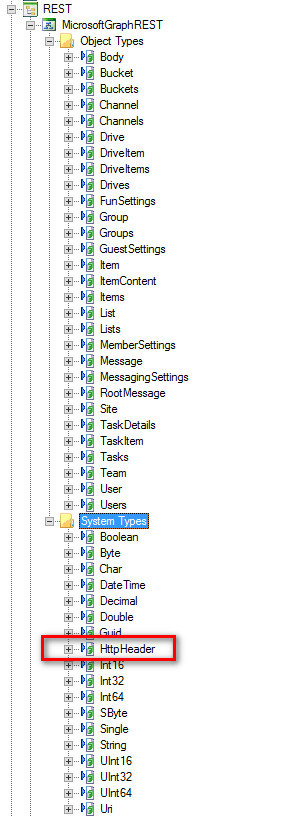
You might be tempted now to right click the various objects and generate the SmartObjects. I did this to start with and then realised that isn’t the best way to approach it in this case.
Create SmartObject(s)
Now let’s create a SmartObject which will allow us to get the Buckets for a specified Plan, Create a Task and update the Description in a Task.
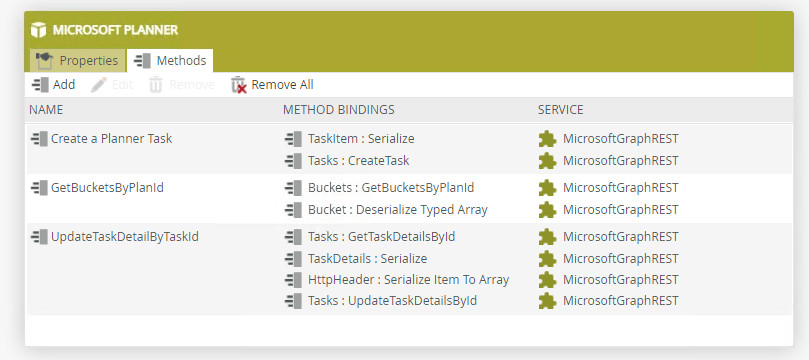
As you can see, I created a single SmartObject in the K2 Designer which has three methods.
Each method chains multiple other methods from the service object types available from the service instance.
You can see that there is a lot of serialize and deserialize methods used. This is to convert the properties in our SmartObject to JSON suitable for use with Microsoft Graph.
When you open a plan in Microsoft Planner, the URL will reveal the Plan Id For example;
In this particular plan I have three buckets. Of course I could create additional SmartObjects and UI to get the plans and the buckets. For this demonstration I have kept is pretty simple.

So now I have the plan id, I need to get the id of the bucket I want to create the task in. To do that, I will use one of my SmartObject methods, ‘GetBucketsByPlanId’.
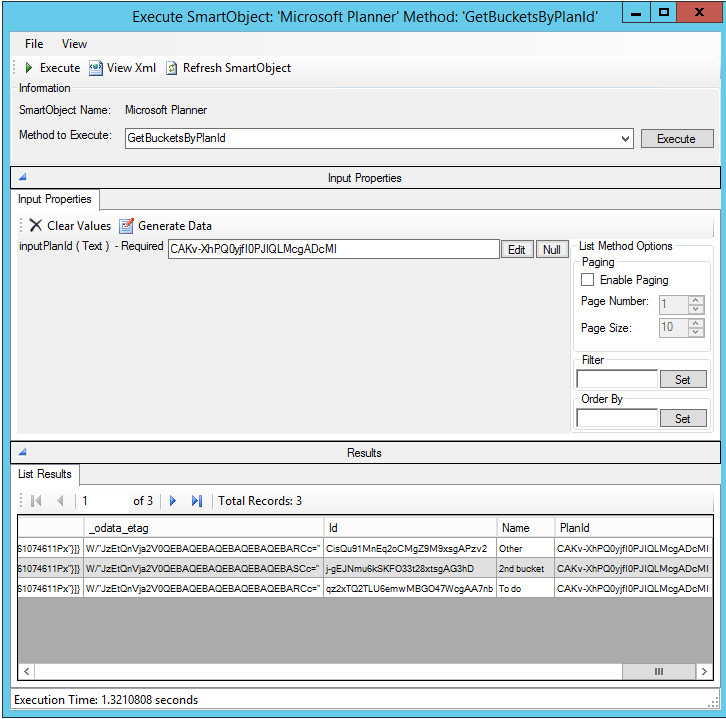
When I click execute, it needs to get a token, so a browser opens and I need to login.
Then I should see a message like this;

You can see in the results, I got back the id of the three buckets in my plan. So I now have the plan id and the bucket id.
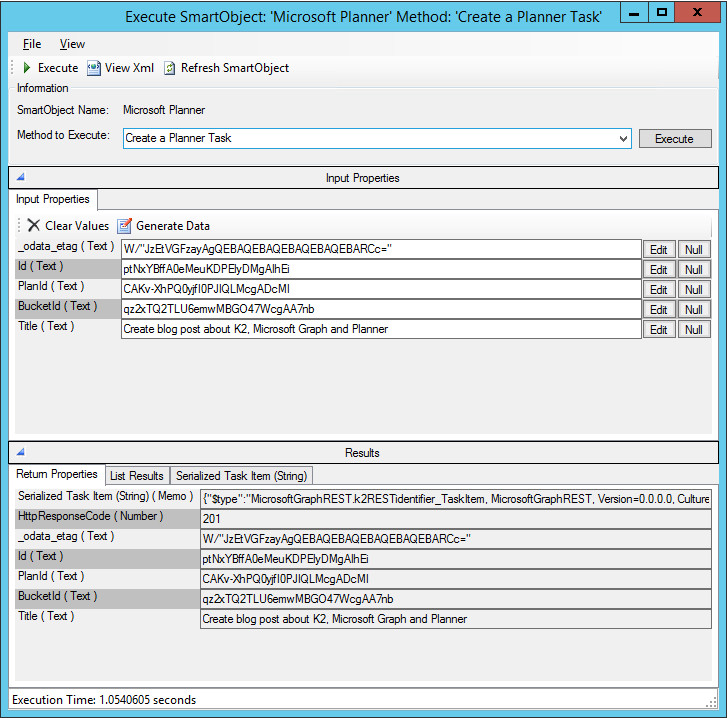
After it executes, you can see the new task in your selected bucket in the plan.

The last thing I want to do is update the description in the task. To do that I will need the id of the task which was returned from the Create call.
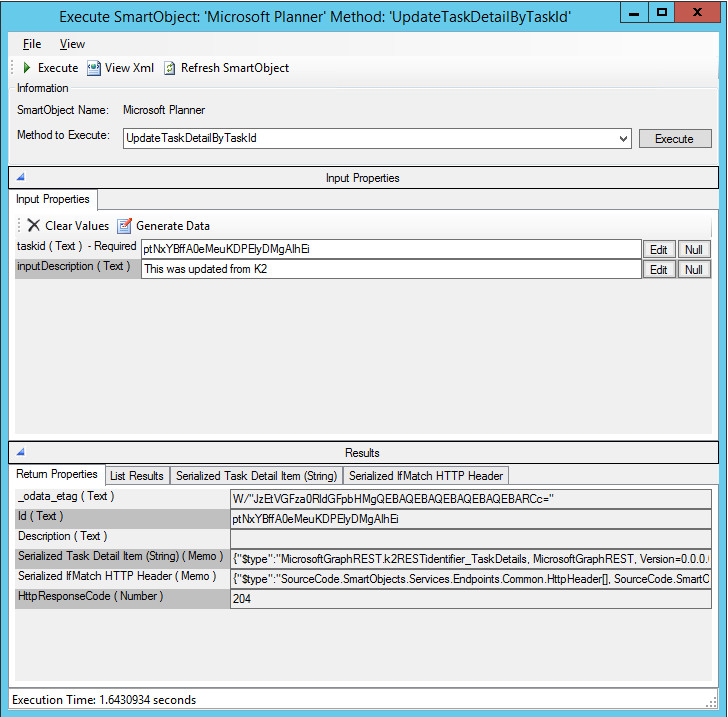
The result of this is;
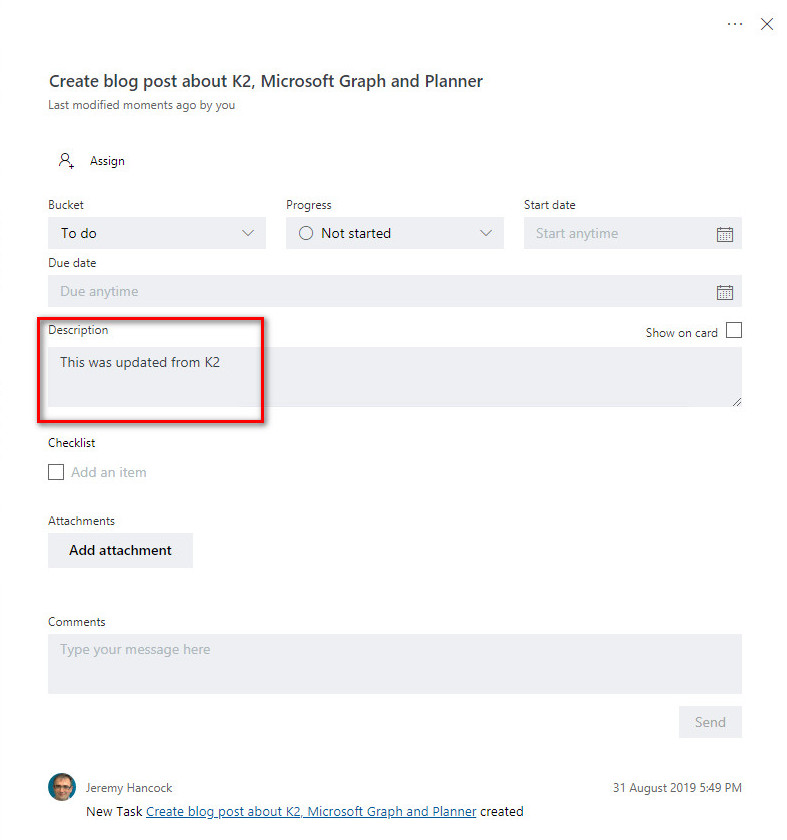
The tricky part for me at least was how to make that call. You can see below that this consisted of four different calls.
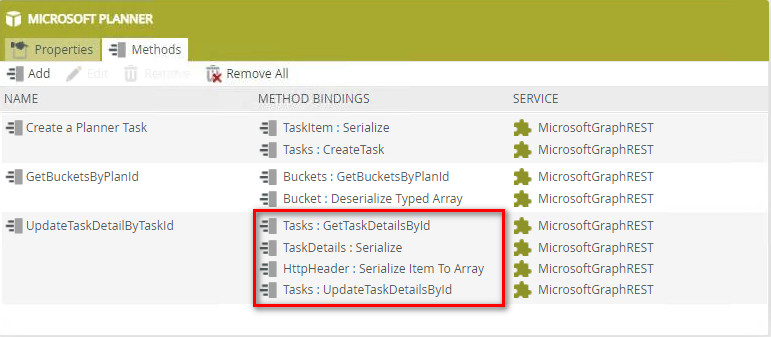
The first gets the task details by id. The reason I needed to do this is that Graph needs the etag of the DESCRIPTION in the IF-MATCH header. (Not the etag of the task itself.) I then serialise the input parameters to JSON. Add the IF-MATCH header to the request by using the ‘Serialize Item To Array’ method of the HttpHeader type. And finally call the ‘UpdateTaskDetailsById’ on the Task type.
So now I have a SmartObject that can be used in views, forms and workflows.
When I created a workflow to test the creation of the task, I hit a problem. The workflow threw an error;
SmartObject Runtime.Management General Error: 'OAuth token requires authorization
This had me scratching my head and working with K2 Support for a number of days. No matter what I did, I couldn’t work out how to get the token that the server could use to execute the call.
In the end, the answer was staring me in the face. The K2 error included a URI. I just needed to copy that URI and open it in a browser. Then my workflow worked and created my task with it’s description.
I realise this was a pretty long post, but I hope that it helps you more quickly get to the point of being able to leverage Microsoft Graph with K2.